Out of the 5 birthday parties, 3 store openings, 1 graduation ceremony, and 2 weddings I’ve been to over the past year, 8 events featured a balloon arch or garland!
It’s safe to say that balloon arches and garlands have soared in popularity, and I’m all here for it! I mean, they’re super versatile, relatively affordable, and end up looking great in pictures, so what’s not to love?
If you’re a DIY head like me, then you probably couldn’t rest until you’ve learned to build these balloon decorations yourself. Well, you’re in luck – today’s article is an easy step-by-step guide on how to make a balloon arch with strip to save you time, effort, and money.
If you’re not familiar with a balloon strip, let me tell you now: it’s going to rock your balloon decorating world! It’s basically a plastic strip with holes that hold balloons’ knots, but I’ll explain more below, so let’s get started!
What You Need — Supplies List
Ask any good DIYer, and they’ll tell you that a successful project always starts with gathering all the tools and materials necessary to complete it. The last thing you want to do is find out mid-execution that you don’t have any glue or you forgot to buy tape!
So here’s a list of the supplies you’ll need to put together a balloon arch using a decorative balloon strip:
1. Balloons
First of all, you’re going to need balloons, a lot of them. Well, it really depends on the size of the balloon arch you want to build, but I’d say the minimum for this type of project is about 100 to 150 balloons.
These are enough balloons to make an arch that goes about halfway over a standard doorway. You’ll need double the number of balloons if you want to make a full arch that goes all the way over a standard doorway.
Of course, if you want a bigger arch, you’ll need more balloons.
My advice in this aspect is “better safe than sorry”, so buying more balloons than your arch ends up needing is way better than running out of a balloon while building it. Not to mention, you can always save the extra balloons for your next balloon decoration!
As for the size of the balloons, that’s really up to your taste. Personally, I prefer the way arches look when you mix big balloons with small ones. It’s just prettier, fuller, and seems more professional.
Color-wise, it comes down to the occasion and your preference. You can choose any number of colors you want, but I think 3 or 4 is the sweet spot.
Some of my favorite color combinations are lilac/navy blue/grey, black/gold/champagne, and white/gold/baby pink/hot pink.
2. Electric Inflator
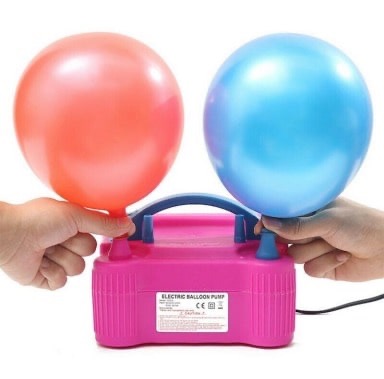
Image source: Pinterest
Next, you’ll need an electric inflator to blow up the balloons. You may be on the fence about buying an inflator, but trust me, you don’t want to blow all those balloons up yourself.
Not only will you go out of breath really fast (probably around balloon number 20), but you’ll also take a lot longer to get all the balloons inflated than if you’d just used an inflater.
Investing in an electric inflator can reduce the time it takes to blow up balloons by more than half the time it takes when using a hand pump even.
It’s not even fair to compare an electric inflator with your lungs; the number of balloons that’d take you an hour to manually blow up will be done in less than 20 minutes if you use an inflator.
If you don’t want to buy an electric inflator, you can get a balloon pump instead. It’s more convenient than blowing balloons yourself, but it’ll take a while longer than an inflator and will require some elbow grease from you.
3. Balloon strip
This is the key element of today’s project that’ll help you arrange and fix your balloons into the desired arch shape. So if you’re not familiar with this handy tool, it’s time I introduce you!
A balloon decorating strip or a balloon decorating tape is a plastic strip with holes spread across its length. It’s transparent so you don’t need to worry about its color interfering with the color scheme of the balloons.
These strips come in 3 different configurations when it comes to the size and placement of the holes. There are strips with single same-size holes, strips with single different-size holes, and strips with key-shaped or double holes.
For a balloon arch, you can use any type of balloon strip as long as you’re blowing up the balloons to the proper size.
4. Wall hooks
To hang your balloon arch over a doorway or on a wall, you’ll need to buy some wall hooks. The type with an adhesive back is what I prefer most since it’s easy to set up and take off. It also doesn’t leave marks behind or damage the wall
Since the balloon arch is very lightweight, adhesive wall hooks are enough to support them. There’s no need for nails unless you already have them hammered.
5. Glue dots
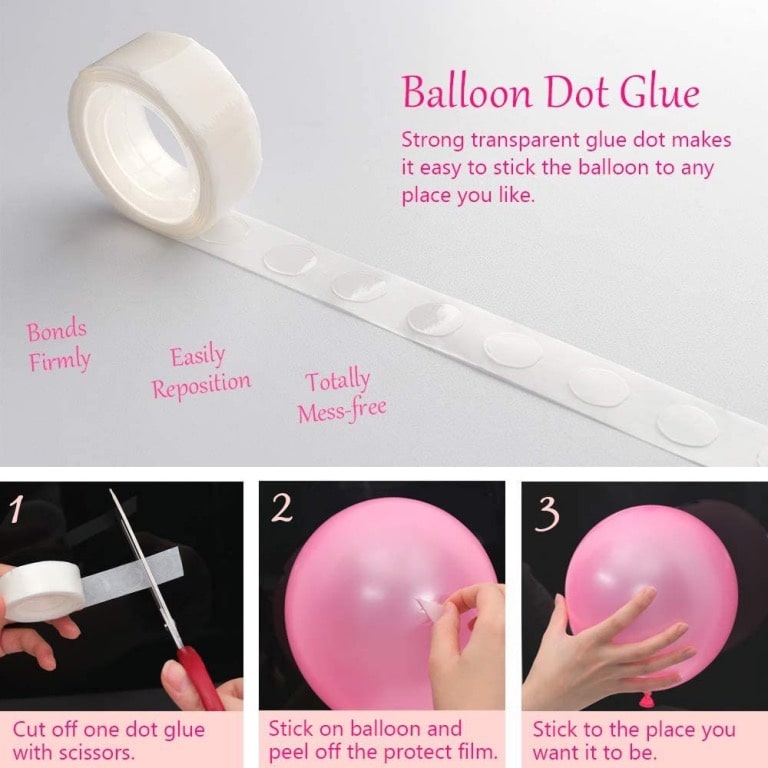
Image source: Pinterest
These will help you stick smaller balloons onto the balloons fitted into the strip to fill up any empty spaces and add an extra dimension to the arch.
6. Additional ornaments
This one is optional and depends on the theme of the occasion. Some ideas you can try are faux flowers, fresh flowers, ribbons, tulle, or leaves.
7. String
8. Scissors
9. Pencil
How to Make a Balloon Arch With Strip — Steps
Now that you have your supplies ready, it’s time to roll up your sleeves and get to work.
Step 1: Blow up the Balloons
The first step is for you to blow up all of the balloons that you’ve estimated making your arch will require. As I mentioned earlier, an electric balloon inflator will help do it quickly and effortlessly.
Be sure to inflate the balloons into appropriate sizes according to the holes in the strip. Smaller holes typically hold balloons 3 to 9 inches large, while bigger ones can hold balloons up to 18 inches large.
Even if you got a single same-size hole strip, it’s better if you inflate your balloon into different sizes to make the arch look more interesting.
When blowing up the bigger balloons, make sure you don’t inflate them. You’ll know you overdid it if your balloons look like a pear. You want them to look more symmetrically rounded like a ball.
Step 2: Add Balloons to the Strip
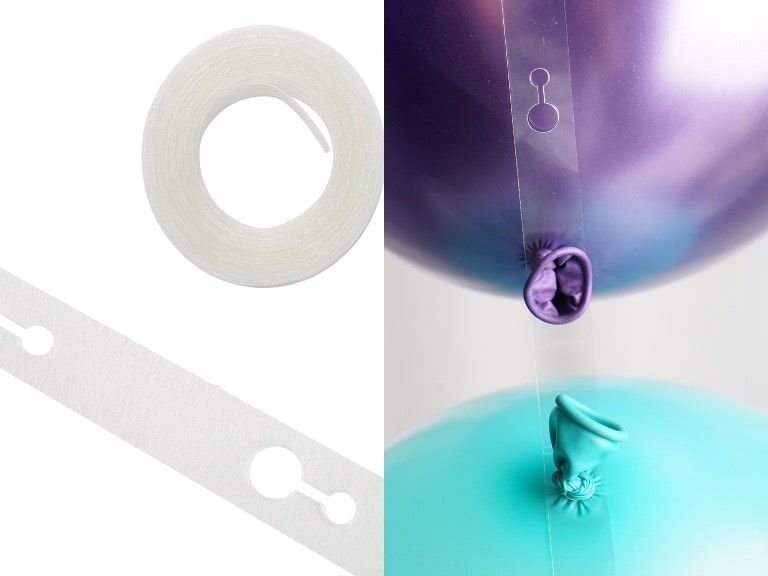
Image source: Pinterest
With all your balloons inflated and tied, start to insert them into the strip. Just grab the knotted end of each balloon and push it through the hole.
You don’t need to follow a specific pattern of colors if you don’t want to. Random color placement can look pretty awesome in my experience.
Continue to add balloons to the strip until the arch is as long as you want it to be. Once you reach the desired length, cut the balloon decorating strip and place the arch on the floor.
Step 3: Attach Wall Hooks
Grab the wall hooks and attach at least 3 to 4 hooks at different points that would make an arch shape if you were to connect them. You may want to use a pencil to mark these spots first to avoid sticky mistakes.
Step 4: Make String Loops
Grab the string and cut pieces that are long enough to go through a hole on the balloon strip then get tied into a loop. You’ll need as many string loops as the number of hooks you put on the wall.
Step 5: Hang the Arch
Hang the balloons on the wall by linking the string loops to wall hooks. You now have a balloon arch!
Step 6: Touch Up
This step is all about final touches to make the balloon arch look fuller and prettier. Grab small balloons and use the glue dots to stick them on the arch wherever you can see any empty spaces.
This is also the time to add any extra ornaments you want. Once you’re done, take a step back and admire your creation!
Other Styling Ideas
Using a balloon decorating strip, you can also make other shapes with balloons besides an arch such as:
- A balloon garland — this one looks like a crooked half-arch.
- A balloon wave — here, you’ll just need to place your wall hooks in an alternating up-and-down pattern.
- A balloon banner — here, you’ll place the wall hooks in a straight line.
- A balloon frame or half-frame — this is where you place the hooks to make an upside-down L-shape. You can do just one ‘L’ or add a mirroring one to make a full-frame.
Wrap Up
There you have it, a step-by-step tutorial on how to make a balloon arch with strip. While it may seem like a complicated task, using a balloon decorating strip transforms it into a fun project that you can do with your family or friends!